

Whether you're a first-time rockhound or an experienced lapidary artist, there's something incredibly satisfying about transforming rough stones into polished gems. At Rocksmith Studio, we believe rock tumbling is part science, part art, and one of the best ways to appreciate the natural beauty hidden inside every stone.
In this guide, we'll walk you through the best way to tumble rocks, from choosing the right material to achieving a mirror-like polish.

What Is Rock Tumbling?
Rock tumbling is the process of smoothing and polishing rough stones by rotating them in a barrel with abrasive grit and water. Over several weeks, the friction mimicking natural river erosion gradually removes rough edges and reveals the stone's hidden colors, patterns, and crystalline shine.
The result? Beautiful polished stones perfect for handmade jewelry, home décor, mineral collections, wire wrapping, or thoughtful gifts.
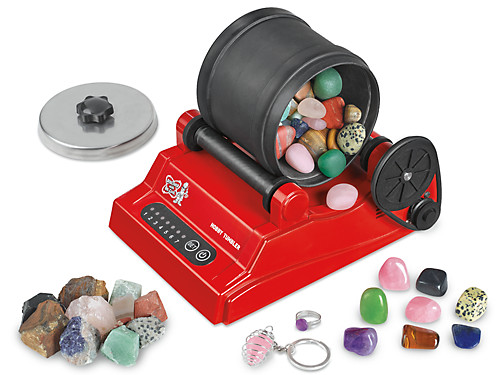
Choosing the Right Rocks
Not every rock tumbles well. The best candidates are durable stones with a hardness of about 6–7 on the Mohs hardness scale. Mixing rocks of similar hardness helps ensure even polishing and prevents softer stones from getting worn away or scratched by harder materials.
Some of our favorite tumbling materials include:
-
Agate & Jasper: Highly durable and forgiving options like Australian Mookaite Jasper or classic Green Aventurine.
-
The Quartz Family: Excellent for high-gloss shine, including Rose Quartz, Smoky Quartz, Clear Quartz, and vibrant Purple Amethyst tumbled stones.
-
Unique Minerals: Fascinating structural rocks like Rainbow Fluorite or cross-patterned Chiastolite Fairy Stones.
⚠️ A Note on Soft Stones: Softer gemstones require extra care and are generally better suited for experienced tumblers. Minerals like Malachite can scratch easily or require specialized burnishing steps to achieve their rich, silky finish.
Equipment You'll Need
Getting started is simple. Before running your first batch, gather these essentials:
-
A rotary rock tumbler: A quality machine built to run continuously for weeks.
-
Tumbling grit: Coarse silicon carbide, medium silicon carbide, fine pre-polish, and a high-grade final polish compound.
-
Plastic pellets: Optional, but highly recommended for cushioning stones and maintaining proper volume.
-
Water: Just regular tap water to form the tumbling slurry.
-
Rough rocks: Sorted strictly by similar hardness and size.
💡 Pro Tip: A properly filled barrel—about 2/3 to 3/4 full—produces the best results. If you don't have enough rock to hit this level, use plastic pellets to make up the volume.
The Four Stages of Rock Tumbling
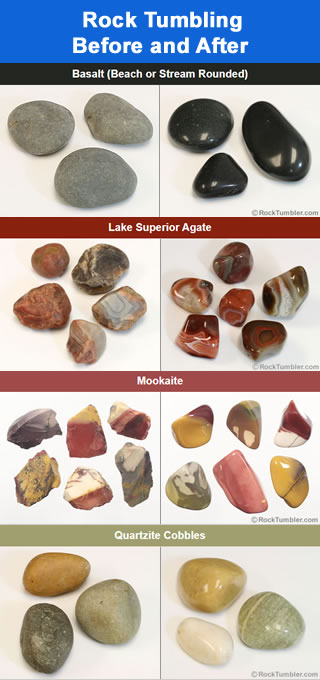
Rough Stones ➔ [Stage 1: Coarse] ➔ [Stage 2: Medium] ➔ [Stage 3: Pre-Polish] ➔ [Stage 4: Polish] ➔ Shiny Gems!
Stage 1: Coarse Grind
This is where the magic begins.
-
Duration: 7–10 days
-
Grit: Coarse silicon carbide
-
Goal: Remove jagged, rough edges and radically shape the stones.
-
Note: After this stage, inspect every rock. Any deep cracks or pits should either continue in coarse grit for another cycle or be removed from the batch.
Stage 2: Medium Grind
-
Duration: 7 days
-
Grit: Medium silicon carbide
-
Goal: Smooth out the deep scratches left behind by the coarse grind.
-
Note: Clean your rocks and barrel thoroughly before moving to the next stage to avoid grit contamination.
Stage 3: Pre-Polish
-
Duration: 7 days
-
Grit: Fine pre-polish aluminum or silicon carbide
-
Goal: Prepare the stones for their final shine. By the end of this week, your rocks should feel incredibly smooth and have a matte satin look.
Stage 4: Polish
-
Duration: 7 days
-
Polish: Cerium oxide or aluminum oxide polishing compound.
-
Goal: This final stage brings out the deep color, internal clarity, and hyper-reflective, mirror-like finish that makes polished gemstones so beautiful.
Many hobbyists finish with a 24-hour burnishing cycle using water and a small amount of mild, non-abrasive soap to strip away any stubborn, microscopic polish residue.
What Can You Make with Polished Stones?
After tumbling, your stones are ready for countless creative projects. If you enjoy crafting, you can use jewelry components like Faceted Copper Rutilated Quartz Beads or integrate your freshly tumbled gems into a custom Stone Charm Necklace.
If you love displaying raw textures alongside polished ones, try showcasing your finished stones next to stunning statement pieces like a Dream Amethyst Sphere, an Amethyst Geode Sculpture, or an Assorted Gemstone Egg Collection Box.
For those who want to skip the tumbling wait entirely and jump straight into design, you can style ready-to-wear artisan jewelry like raw Lepidolite Crystal Earrings or look for jewelry making components featuring pre-finished focal points, including:
Common Rock Tumbling Mistakes to Avoid
-
Mixing soft and hard rocks: Hard quartz will pulverize softer calcite or fluorite over a multi-week run.
-
Skipping grit stages: Every step relies on the previous stage's scratches being smoothed out.
-
Using dirty equipment: A single grain of coarse grit accidentally introduced into Stage 4 can scratch and ruin an entire batch of polishing stones.
-
Opening the barrel too often: Trust the process and let the tumbler do its job without breaking the seal constantly.
-
Dumping slurry down the drain: Never wash grit down your household plumbing—it will settle in your pipes and harden into actual concrete! Always rinse stones into a bucket outdoors.
Final Thoughts
Rock tumbling teaches patience, craftsmanship, and a deep appreciation for the natural artistry hidden inside every stone. Whether you're polishing agates collected on a coastal rockhounding trip or transforming basic quartz into jewelry-ready gemstones, every batch tells a unique geological story.
At Rocksmith Studio, we're passionate about lapidary arts, handmade craftsmanship, and helping others discover the joy of working with natural minerals and prehistoric wonders—like our polished Ammonite Fossil Pairs. We hope this guide helps you achieve your best, most radiant polish yet.
Happy tumbling!
0 comments